Quotes Feature Guide
On this page
- Understanding Quotes
- Starting a New Quote
- Configuring Your Quote
- Quote Template Configuration
- Building Your Quote
- Quote Preview and Templates
- Communication and Quote Delivery
- Quote Management
- What You’ve Learned
This guide covers the Quotes feature in Quote Cactus, explaining how to create, configure, and send professional quotes to prospects. The Quotes feature provides a comprehensive platform for converting prospect inquiries into detailed proposals that close sales.
Understanding Quotes
A full quote is where you make the sale. With a complete quote, you’ll outline everything you will do to bring the prospect’s vision to life in detail. You’re giving the prospect all the information they need to decide to work with you over your competitors.
Quotes can be as complex as you want or need them to be to make the sale. They are entirely customizable to your business’s specific needs, allowing you to present detailed line items, flexible pricing structures, and personalized messaging that demonstrates your professionalism and attention to detail.
The platform automatically manages quote delivery, prospect notifications, and response tracking to ensure no opportunity is missed while maintaining clear communication throughout the sales process.
Starting a New Quote
You can start a quote from several different places within the platform, providing flexibility in your workflow and ensuring quotes can be created whenever opportunities arise.
Multiple Entry Points
From the Dashboard page: Click the ‘Start quote’ link for quick access to quote creation from your main workspace.
From the Quotes page: Access the complete quotes management interface and create new quotes alongside existing ones.
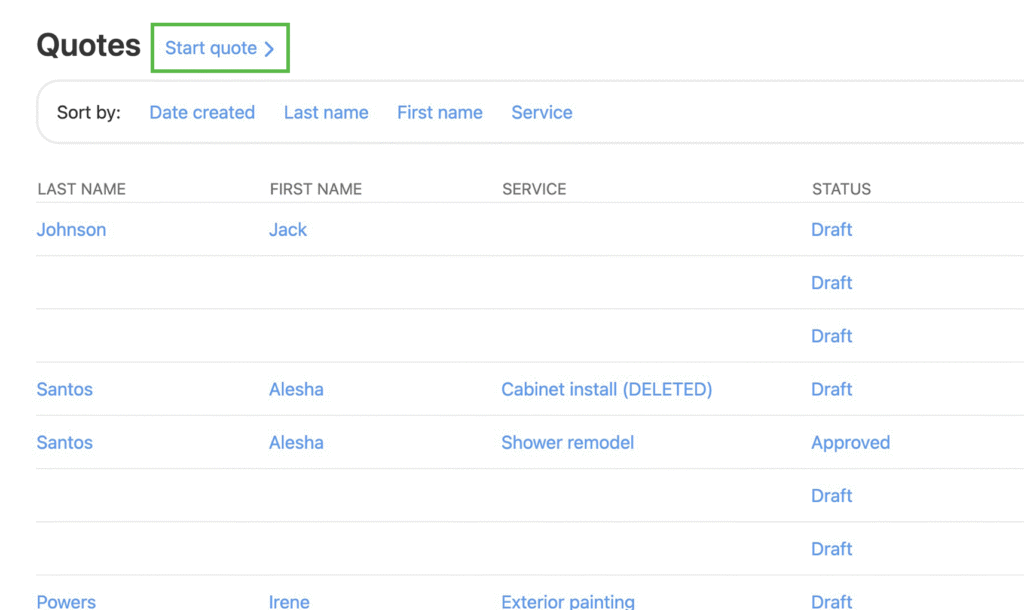
From a Request page: Convert prospect inquiries directly into quotes, maintaining context and streamlining your sales process.
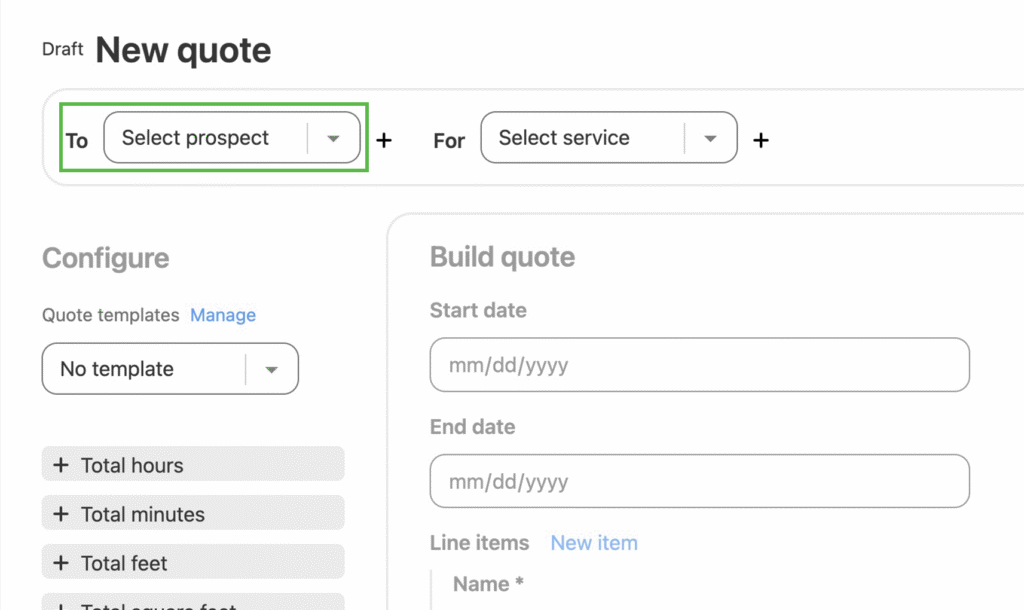
Quote Creation Process
Click ‘Start quote’ and a new quote will be created automatically. Quotes auto-save on any changes made, ensuring your work is never lost and allowing you to build quotes incrementally as you gather information and refine pricing.
Configuring Your Quote
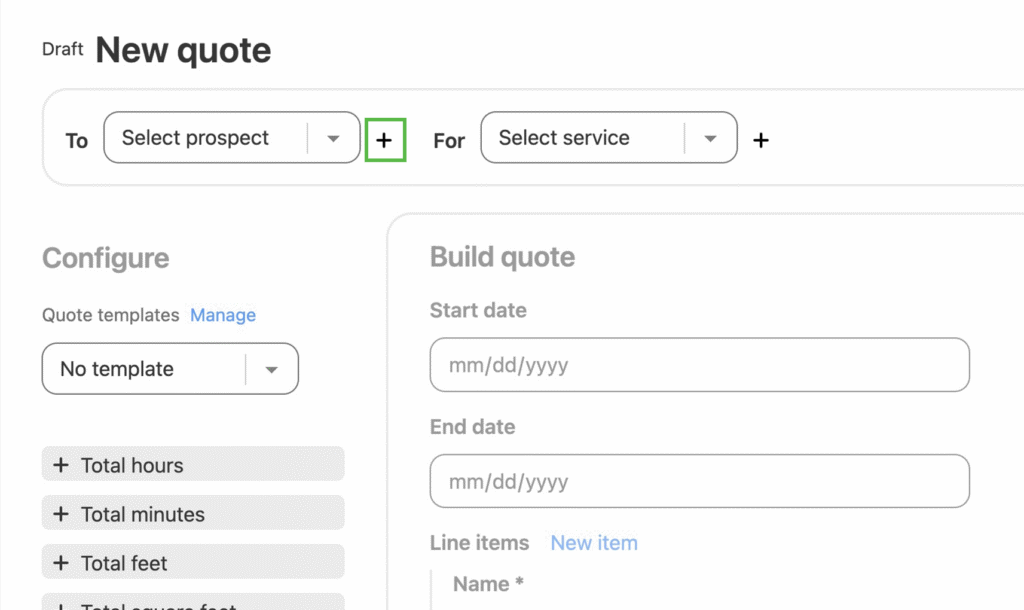
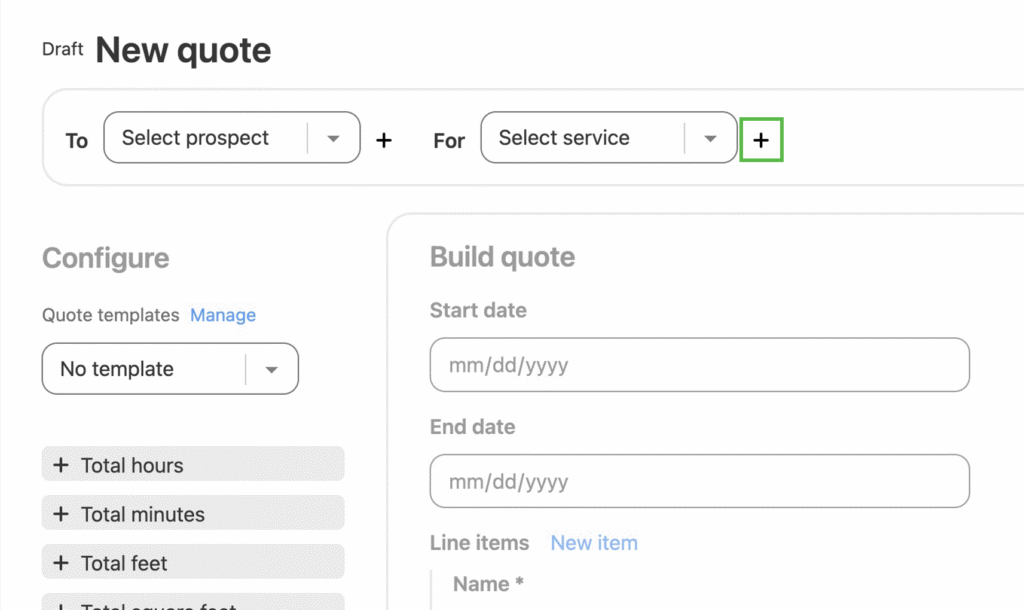
Selecting the Prospect
First, select the prospect to whom you are sending the quote. This establishes the customer relationship and ensures proper delivery and tracking.
Only active prospects are listed in the dropdown. Archived prospects are excluded to maintain a clean, manageable list of current opportunities.
If you are building a quote for a prospect who hasn’t been added yet, you can click the ‘+’ icon to add them. They’ll be automatically selected after you’ve added them, streamlining the workflow for new customer inquiries.
Selecting the Service
Then select the service you’re providing the quote for. This connects your quote to your service catalog and applies relevant pricing structures and configurations.
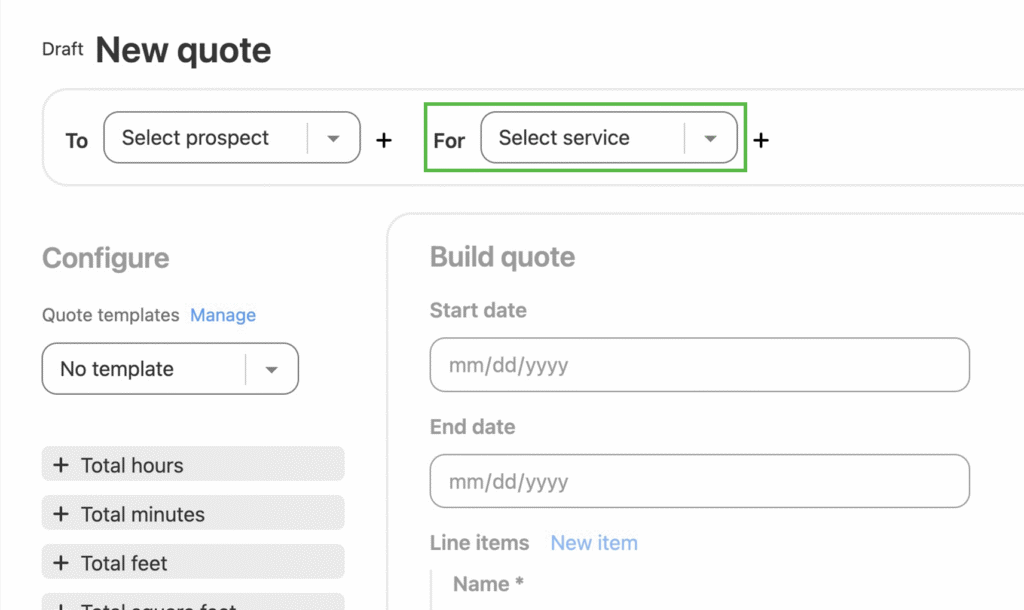
If you are building a quote for a service you haven’t added, click the ‘+’ icon to add it. It will be automatically selected after you’ve added it, ensuring your service catalog stays current with your business offerings.
Quote Template Configuration
Using Saved Templates
If you’ve created a similar quote before and saved it as a template, you can select it from the Quote templates dropdown. Once selected, the quote will be configured automatically based on the template, saving significant time on recurring quote types.
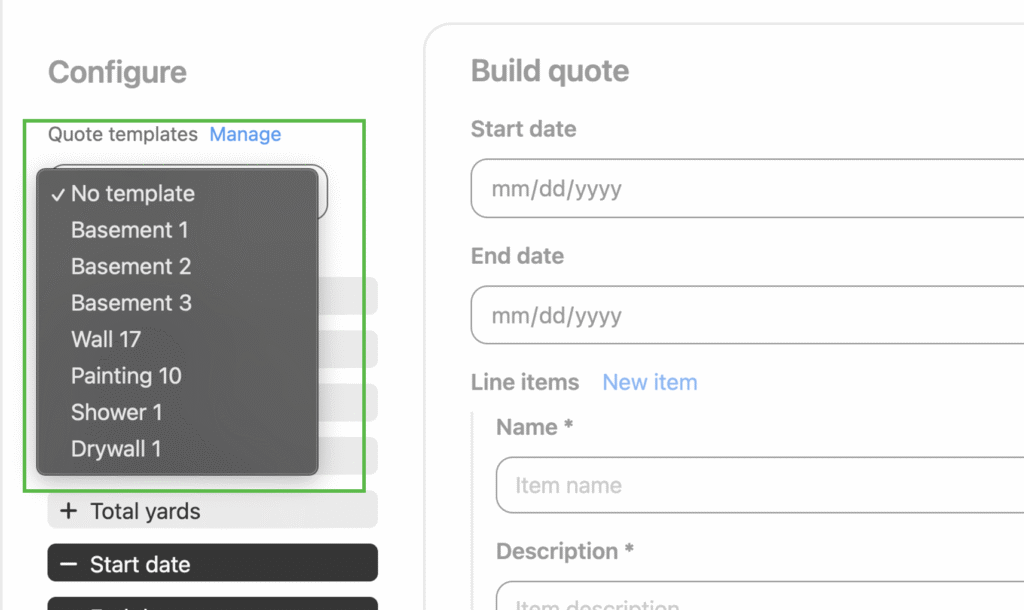
You can delete templates you don’t need anymore by clicking the ‘Manage’ link, helping you maintain an organized template library that reflects your current service offerings.
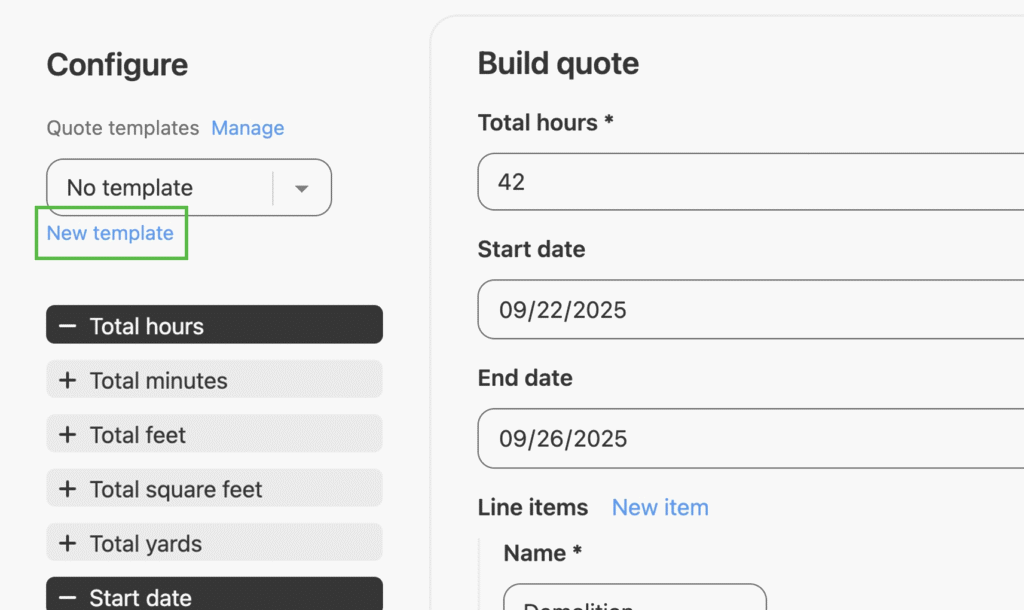
Field Configuration
Use the toggles to enable or disable fields based on what information you need to include in this specific quote.
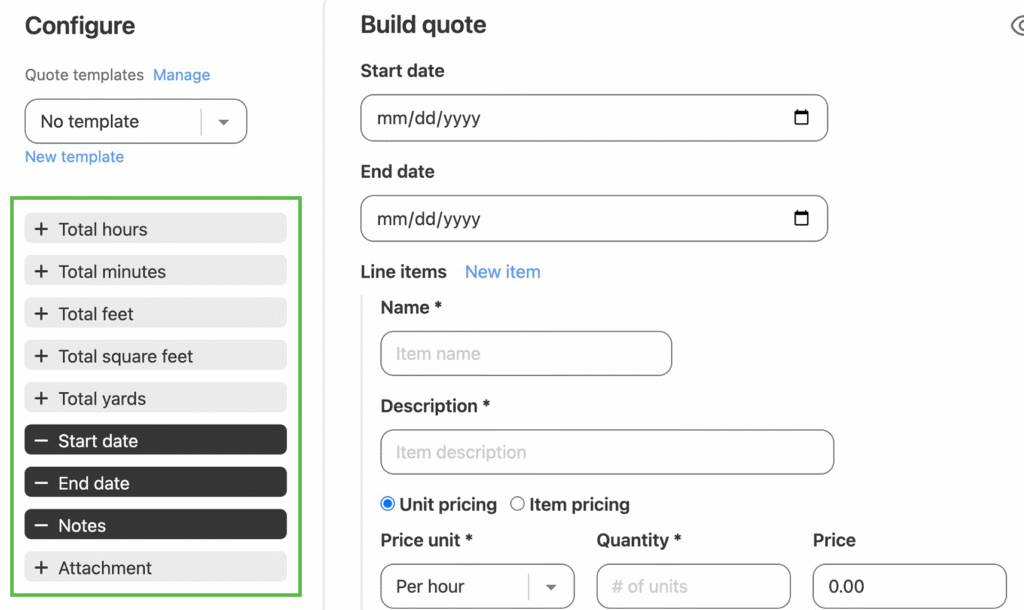
Available Field Options:
- Unit-based fields: Include fields for hours, minutes, feet, square feet, and yards. You can use multiple unit fields in the same quote to accommodate complex projects with different measurement requirements.
- Project timeline: Use ‘Start date’ and ‘End date’ to include when the project will begin and when it will end, providing prospects with clear expectations about project scheduling.
- Personal notes: Toggle on notes if you plan to send a personalized note to the prospect as part of the quote. This is recommended as it helps build your relationship with the prospect and demonstrates your commitment to their specific needs.
- File attachments: Toggle on an attachment if you plan to include a file with the quote. Common uses include:
- A lookbook of similar projects to show the prospect that you’ve done this type of work before
- A testimonials sheet from satisfied customers
- A promotional video or brochure
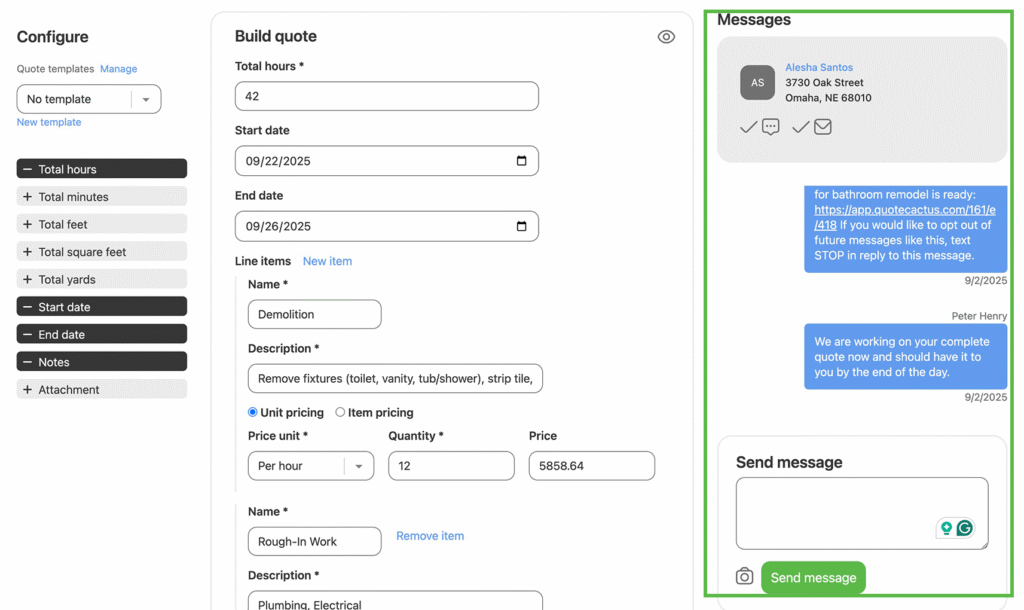
Building Your Quote
After you’ve configured the quote, you can finish building it by entering values into the fields you previously enabled during configuration.
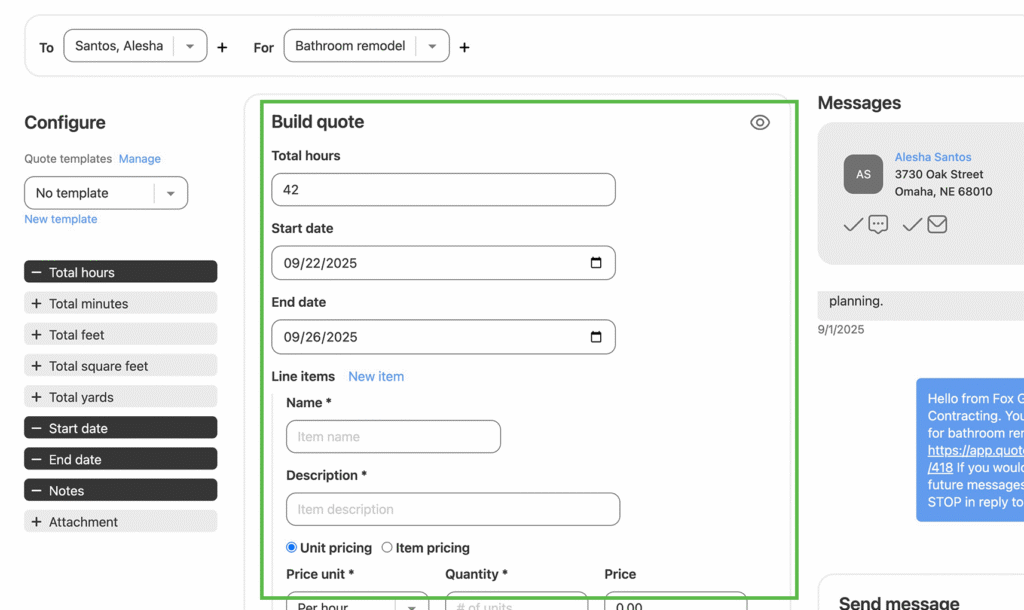
Adding Line Items
You add line items to provide a detailed list of all the costs associated with the project. You can get as granular as needed, depending on the project complexity and customer expectations.
Quotes must have at least one line item to be complete and sendable.
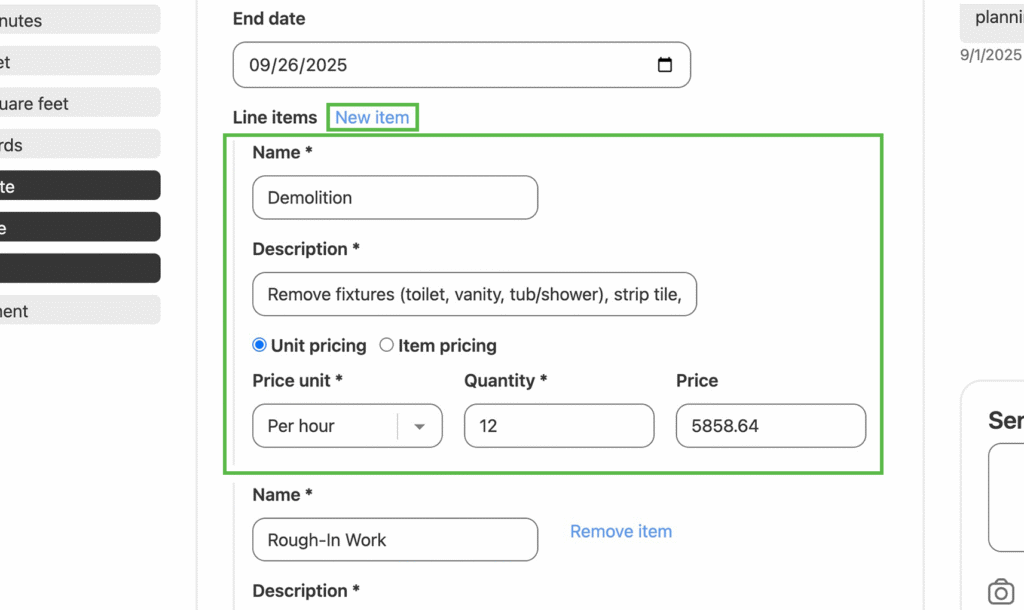
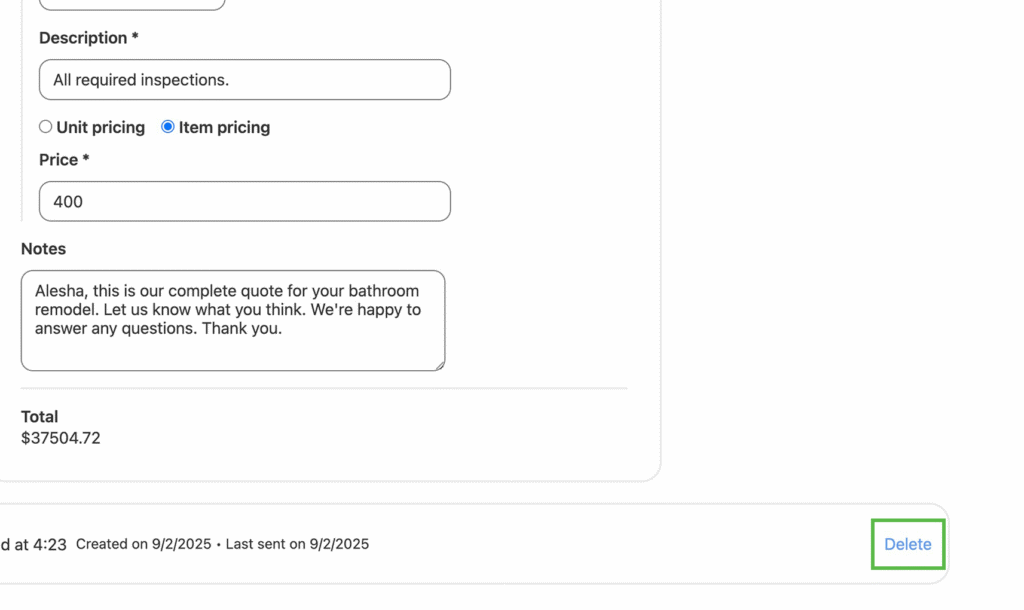
Line items have a name, description, and price. Each component allows you to provide clear, detailed information about what the prospect is paying for and why.
Line Item Pricing Options
There are two options for pricing a line item, providing flexibility to match your business model and project requirements.
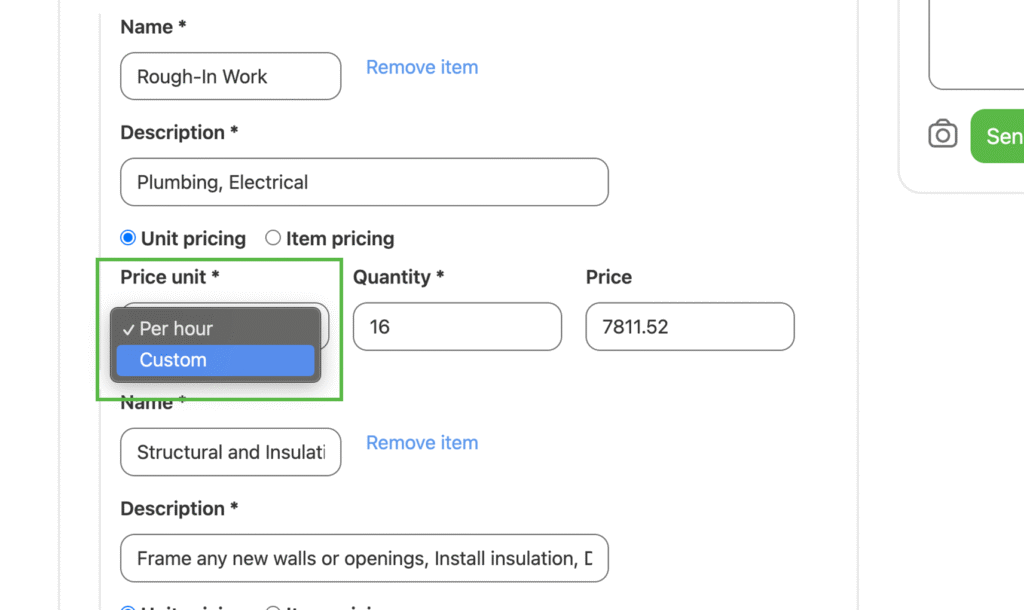
Unit Pricing
Use unit pricing when you need to add line items where the cost is based on a unit of measure, like hours or square feet.
Set a price unit for the line item. The units listed in the dropdown are the pricing units you’ve added to the service for which you’re providing the quote.
You can add a custom unit by selecting the ‘Custom’ option. If selected, you’ll need to add a name for the unit of measure and a per-unit price.
The total cost for the line item is calculated by multiplying the per-unit price by the quantity.
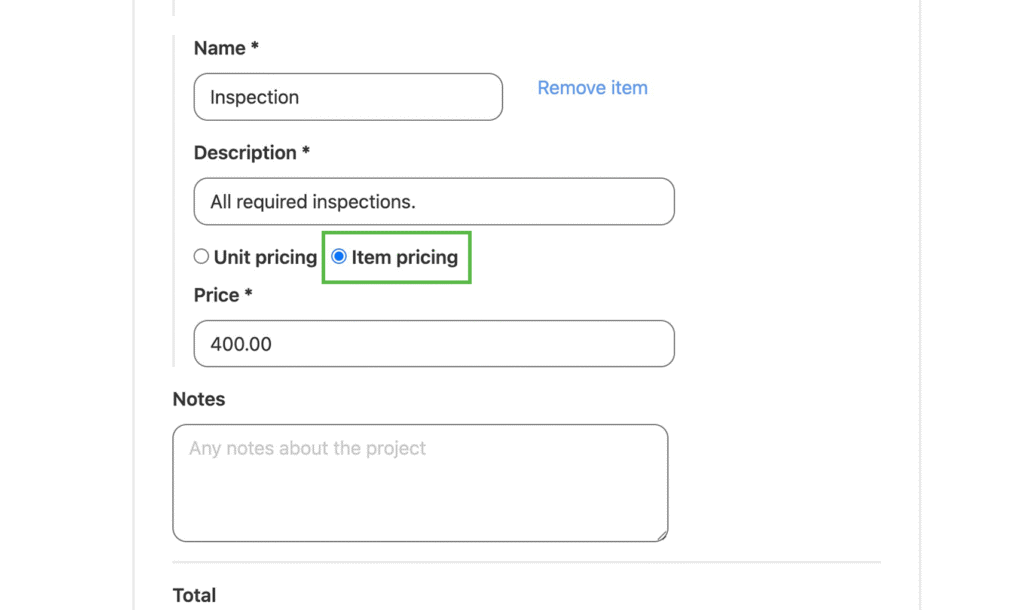
Item Pricing
Use item pricing when you need to add line items where the cost is a set price.
The total cost for the line item is the value you put in the Price field.
Quote Total Calculation
The quote’s total price is the sum of all the line items you’ve added. This calculation updates automatically as you modify line items, ensuring accuracy and allowing you to see the impact of pricing changes in real-time.
Quote Preview and Templates
Previewing Your Quote
Preview the quote by clicking the eye icon in the top right corner of the builder column. This preview will show you what the prospect will see in your white label customer portal, ensuring your quote appears professional and contains all necessary information.
Creating Templates for Future Use
If you plan to send similar quotes in the future, you can create a new template from this quote by clicking ‘New template’. Once you’ve saved the template, it will be available when creating new quotes in the future, streamlining your workflow for recurring project types.
Communication and Quote Delivery
Sending Messages
You can send messages to the prospect from the Message column, maintaining communication within the platform and keeping all interactions organized in one location.
Sending the Quote
When you are ready to send the quote, click the ‘Send quote’ button. This triggers the delivery process and begins prospect notification.
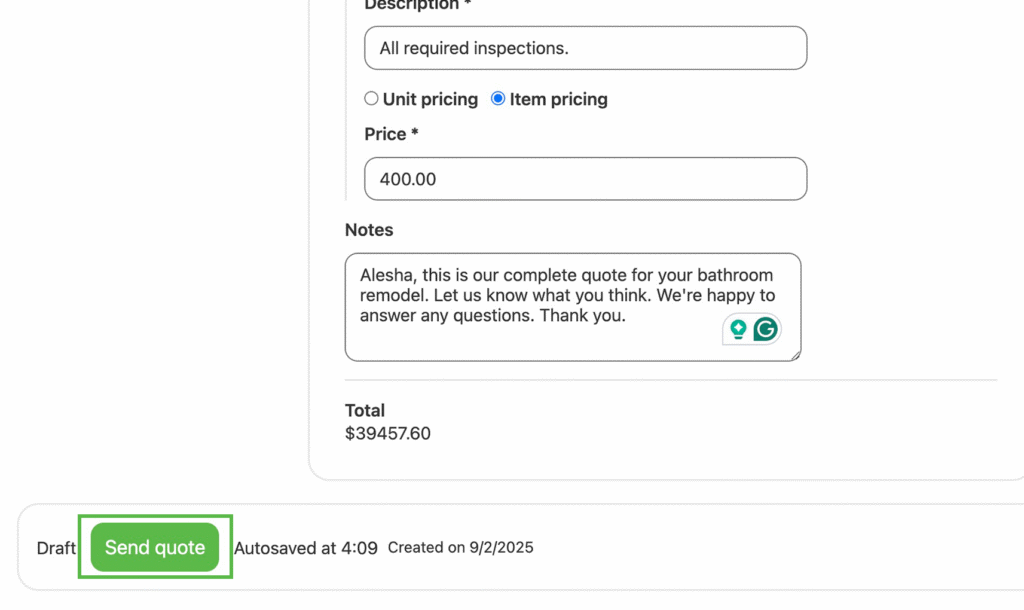
Important: You can only send quotes to prospects who have opted in. Prospects who’ve been added manually are sent an opt-in request immediately. Prospects who have submitted their request via page or text message are automatically opted in. If you need to resend an opt-in request, you can do so on the prospect’s page.
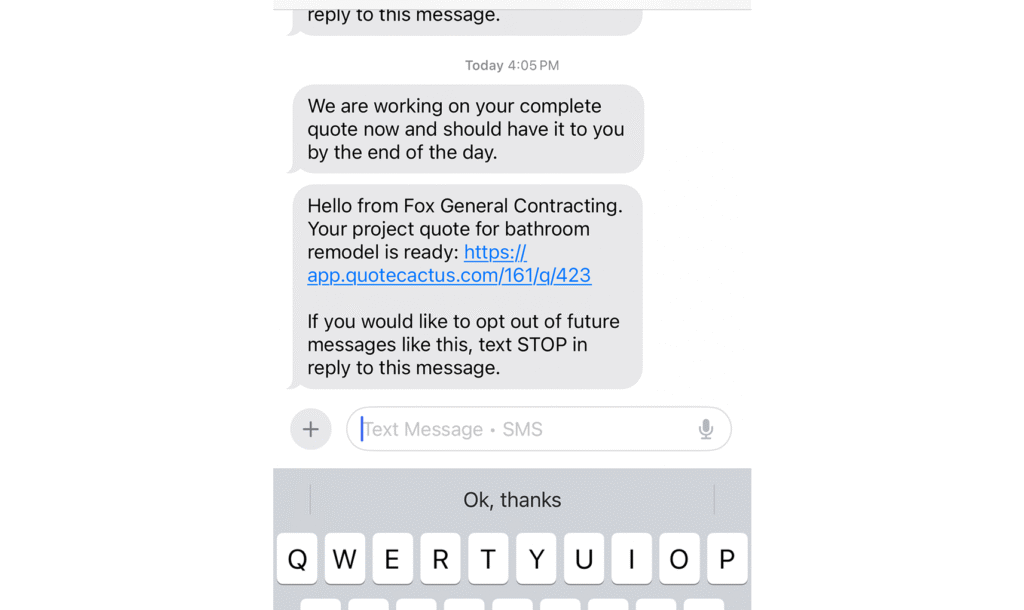
Prospect Notification Process
Once sent, prospects are notified that their quote is ready via text message and email. They can follow the link in the notification to view the quote securely in your customer portal, where they can accept or reject it.
When the prospect takes an action by either accepting or rejecting the quote, you and your team are notified immediately. You will also see recent quote activity for the prospects assigned to you on the dashboard page.
If they’ve rejected it, you can follow up with them via messages to understand why and determine if you can work together on updates to help them reach a price and scope they can accept.
Quote Management
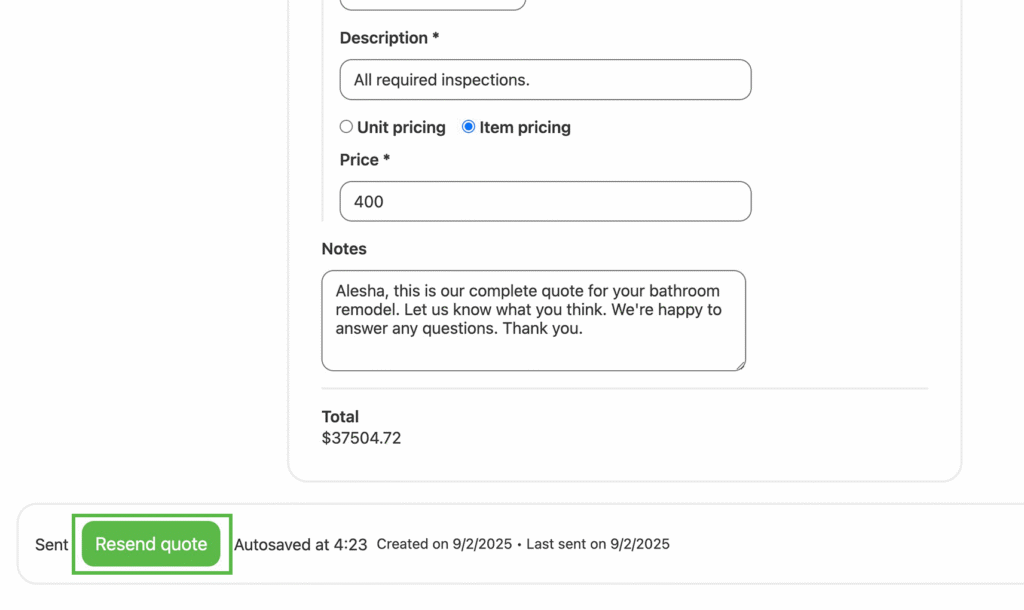
Updating Quotes
If you make changes to a quote, you can resend it by clicking the ‘Resend quote’ button. The prospect is notified that their quote has been updated, ensuring they always have access to the most current information.
Deleting Quotes
You can delete a quote by clicking the ‘Delete’ link. Prospects will no longer be able to view deleted quotes.
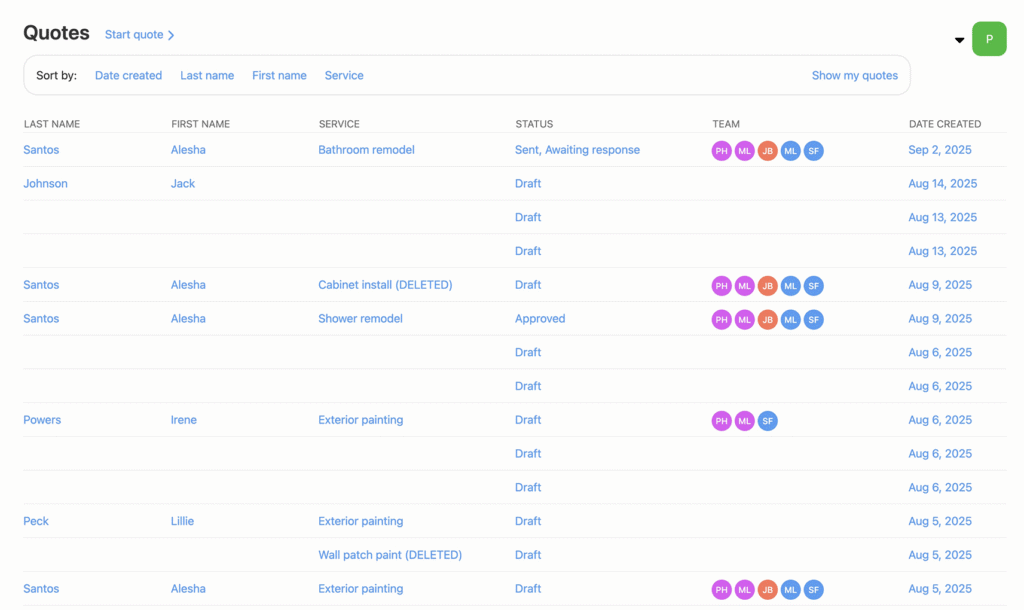
Viewing All Quotes
View all quotes from the quotes page, which is sortable by Date Created, Last Name, First Name, and Service. You can also click ‘Show my quotes’ to view quotes for the prospects you are assigned to only, helping you focus on your specific responsibilities in team environments.
What You’ve Learned
You now understand how to create, configure, and manage quotes in Quote Cactus, from initial setup through delivery and follow-up. This comprehensive quoting system enables you to present professional proposals that convert prospects into customers while maintaining organized communication throughout the sales process.
After mastering quote creation, consider exploring these related features:
- Managing Prospects – Organize and communicate with potential customers
- Service Catalog Setup – Configure your service offerings for efficient quote creation
- Text Messaging Setup – Enable SMS communication for enhanced customer engagement
- Request Management – Convert customer inquiries into quotes and sales opportunities
The Quotes feature serves as the cornerstone of your sales process in Quote Cactus, transforming prospect interest into concrete business proposals that demonstrate your professionalism and win more projects.
Next steps

Account
Edit business details and more.